Installing the Nomadic 3000 12V A/C and MaxxAir Fan on our Transit Van
- JG
- Jun 15, 2022
- 5 min read
Updated: Jun 20, 2022

I read a lot of online comments from folks who are worried about cutting into the metal of their brand-new van. The cutting is the easy part. Getting that A/C up on the roof is a whole other challenge! After we finished installing new rims, tire and a front-lift kit, my husband moved on to the first two big cuts for the van.
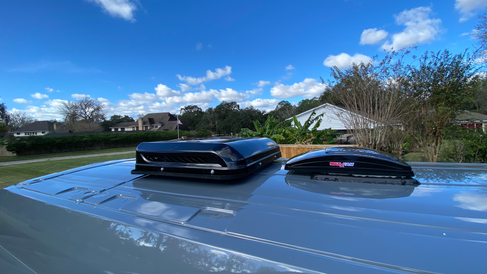
As noted here, we wanted to have both an A/C and a fan in our van. The Maxx Air Fan is commonly used in most van conversions, but as A/C goes, we had to choose between the Nomadic and the Dometic. If you happen to follow FarOut Ride, they offer a great comparison and discussion between the two models (Air Conditioner: 12V Battery Powered A/C for Off-The-Grid Vanlife - FarOutRide). There are many factors to consider, but our main factor was we wanted to be able to have an A/C for off-the-grid use. So, we ordered the Nomadic Cooling 3000 12V (link here). We will install wiring for shore power, and plan to use that when available, but we also wanted to be a bit more self-sufficient in those times we may be on our own. We will get into the electrical and battery design later that is required to run this off-the-grid, but for now, we will have two options to help cool and move air in this van!
I would also like to be able to say that the installation went smoothly, but we did run into a few issues and considerations that required some creative solutions even after following the user guide provided by the manufacturer and watching several YouTube video installations. Below are a few things to think about if you plan on installing a Nomadic 3000 A/C and a Maxx Air Fan in your van.
Determine the footprint and placement for both the A/C and fan and any other items you plan to install on your roof (like a solar panel)
We decided to install both the A/C and the fan at the same time. The footprint for both items are the same, which made the waterproof gasket a nice template tool. Keep in mind that the opening is only a small part of the roof footprint for both items, as the overall dimensions of the A/C itself is larger than the opening, and larger than the fan.

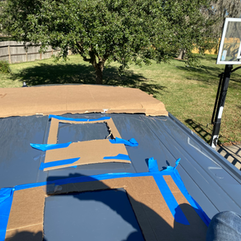


And as we plan to install a solar panel later, we used CAD (cardboard assisted designs) to make sure all three items would fit and that we didn't run into any interference issues later. We also had to consider the location of the internal ribs of the roof (see middle photos) to ensure we weren't trying to cut a hole through one of those. Ryan used a drill bit to start holes in the corners of each square and made the straight cuts with a nibbler. You can see the CAD layout in the first photo, and later the cutout for the fan and where the cut for the A/C will go. After cutting, he filed and primed both openings to protect the edges from rust.
Ideally, you shouldn't see light under the A/C when mounted on the roof


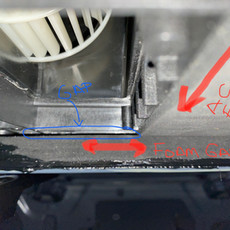


The waterproof gasket was adhered to the roof and sealed using a butyl rubber sealant as recommended in the user guide. By the time he got the A/C on the roof, the sun was beginning to set and dusk upon us. You can imagine his surprise when he went into the van to check the fit and saw daylight peeking through the opening inside the dark van (last picture). This caused us quite some concern regarding the potential for future leaks. Which also meant we had to take the A/C back off the roof, flip it over, and figure out where the gap was in the undermount.


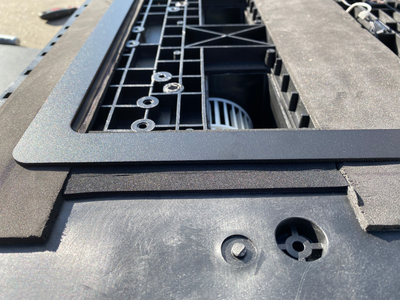
What we found was a noticeable gap between the mounting bracket and the A/C base. The A/C comes with 2 foam strips on the bottom, but not around the entire opening. This was where the daylight was coming through. Ryan developed the perfect solution using strips of
foam weatherstripping to fill in the gaps between the foam strips, creating a uniform surface for the A/C to sit on the mounting base, and more importantly, no gap.
It doesn't hurt to add a few plusnuts

Nomadic provides 4 mounting bolts to screw into the 4 threaded inserts of the base plate. Ryan ran into some issues with the threading when trying to fasten the bolts. In addition to being screwed in, all of the threaded inserts were also epoxied, and one of the inserts had been overfilled with epoxy which prevented the bolt from being able to fully screw into the insert. He was able to remove the threaded insert and remove the epoxy, but at this point he also started to think about the mechanical integrity of the 4 bolts holding down this 60 lb A/C on our roof as we go bouncing down the road. Boats also have to deal with a lot of vibrations, and so based on my husband's marine experience with maintaining and repairing his boats, he likes to use through bolts to provide a secure connection and came up with the idea to add a few through bolts. However, after placing the through bolt, there was no way for him to be able to access the bolt to be able to tighten it. So, he moved on to plan B, which was to install 2 plus nuts for additional security when mounting the A/C to the roof.
After installing the A/C, the MaxxAir Fan is a piece of cake!

The process for installing the fan was relatively straightforward. The preparation of the opening was the same for the A/C: cut, file the opening and prime/paint the edge to prevent rust. In addition to purchasing the fan, you should also purchase the roof vent adapter that is suited for your van type (i.e. Ford Transit) and a backing frame for inside the van. Similar to the A/C, butyl adhesive is used to adhere the adapter and a sealant to waterproof around the flange.
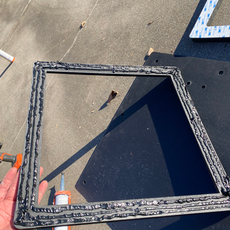
Do you have to install a frame inside? It's not necessary, but does provide additional grab for the screws through the metal roof. You can buy frames on eBay or you can simply build one yourself out of wood, which is what Ryan did here. He used 1/2 inch by 3/4 inch wood strips to build a casing frame inside the opening. This provided additional support to the roof. It was our compromise to using thru bolts, which are not easily removed in the event we needed to be able to take the fan off someday if there was an issue.


All in all, this was about a full 2-day project, with some heaving lifting support from our helpers!